Friday, December 31, 2010

Where to begin?

Even though I haven't posted in over a month I've been cooking and crafting and taking pictures to share with you. And now I'm well supplied with my own set of tri-ply stainless steel pots and pans, a set of corningware, cooking utensils, a waffle iron (which I've already made buttermilk waffles with cherry almond sauce with), a potato ricer, and 6 new cookbooks. Yes, 6. One from Cat Cora, one from Mario Batali, one from Ina Garten, one from Bobby Flay, a cupcake book, and a cookbook which I requested that's all about healthy cooking. And I'm DYING to try recipes from each one out.

From Cat Cora: her hot onion dip and wasabi salmon tea sandwiches, from Mario Batali: any of his pasta or pizza dishes (as if I needed any help loving those foods he makes them look even more incredible), from Ina Garten: her roasted tomato soup and lobster salad, and from Bobby Flay: mac and cheese carbonara. I already made the chocolate mousse cupcakes I was lusting after. As for the healthy one, there's a fettucine alfredo that I'd like to try.

Today is New Year's Eve and even though this is the PERFECT time to have a party so I can try some of these amazing-looking recipes, I find myself without any definite plans for tonight. So I don't know when/how I'm going to find an excuse to make a lobster salad appetizer, but I'll find a way.

In the meantime, I have pictures/posts for:
  • cauliflower gratin
  • peanut brittle
  • triple chocolate marble fudge (which I never took a picture of in the end so I might not post that one)
  • chocolate mousse cupcakes
  • eggs benedict
  • hot cocoa cookies
  • and **my finished afghan**
So look forward to those posts in the near future and I hope everyone had a great, relaxing Christmas and will have a fun, safe new year.

Tuesday, November 30, 2010

As previously mentioned

I mentioned in my last post that I might be out of town for a while. Well, I was. On the Tuesday of the week before Thanksgiving my dad found out that my grandma, his mom, had a stroke in the night. Her left side was completely paralyzed. On Wednesday it was determined that it was massive and she would not recover. She was moved into hospice. Dad left on Wednesday to go see her in Colorado. On Thursday dad called to say that the doctor told him she would be gone in one, two days at the most. So Friday morning mom and I headed out to Colorado. She was more or less unresponsive by the time I got there and was completely blind so she just kept her eyes closed. She was unable to talk (a combination of the stroke and lack of energy). She just kind of...laid there.

Let me just say, I never want to go through that again. You never want to see someone in that condition.

Particularly hard on my dad was having to make the decision to not feed her or give her IV fluids. He felt like by doing that, she would die of thirst and that can't be comfortable. What the people in hospice told us is that when people start the dying process they no longer require food and water the way others do because their body cannot process it. So by denying her these things, her body will feed on her fat in amounts that her body can handle, and will put her into a state of mild euphoria. It sounds nice, but I just wonder how they know these things. Because I'm not so sure that's true. And it bothers me.

To add to the stress, she did not last only one or two days, but five. So she went a week without any food or water. Ugh.

I won't go into the other details but suffice it to say it was quite hard to watch.

The night she died she were finishing eating dinner when we got a call from the hospital. They said she's really not doing well and we should come sooner rather than later. So we dropped everything and left. She passed before we made it there some 10 minutes later.

The hospice there was really wonderful, though. When we walked in to see her that night they had a bunch of flameless candles going and some nice music with the lights dimmed. The counselor that was there was with her when she passed. The counselor said she was peaceful, warm, and not alone. I suppose you can't ask for much more than that. Everyone in the hospice was so great. They put her in real night gowns, not hospital gowns. They made sure her oxygen levels were good and that she was comfortable, and when she would moan or grimace they would up the morphine, then started giving her regular doses of something to calm her down when she seemed unable to remain comfortable. When we came in the nurses would always ask if we needed anything and were very responsive when we asked if they could do something to help her (suction her airway, swab her mouth, etc.). And there were some great volunteers - one came in to give massages to anyone who wanted one to help us de-stress. Another group came and sang some of grandma's favorite hymns to her. It was so nice. Anyway, they were a great help during the whole process.


She passed away Tuesday night, November 23 around 6:45 p.m. She was 89. Her memorial was at 10 am Friday, November 26.

I was surprised at how many people came to the service - I thought it was nice. Her neighbors from Boulder even came up. One of them said she talked about me all the time. That was nice.

So anyway, that's what I've been dealing with the last couple of weeks. Given everything I haven't exactly cooked or worked on anything, and since I'm now playing catch-up I can't guarantee that I will soon, either. So I don't know when I'll be posting. Sorry.

Wednesday, November 17, 2010

It's not what you think

I know it looks like I abandonded this little blog again. But that's not true.

The truth is that I haven't done much worth blogging about. The only things I've cooked recently are recipes I've already put on here (with the exception of one which I will post when I have some real spare time), and I haven't sewn anything or done any crafting. I've been sick lately, which is partially why. The other part is I've been busy or tired from being busy.

That said, Garrick pointed out that in my Halloween post I failed to mention that I made the dress I'm wearing:


It's from a vintage pattern (1960s??). It didn't turn out exactly like I wanted because the neck band ended up being some 2 inches too big so I ended up having to make a dart in it which, in my opinion, looks rather tacky. But I wasn't about to give up on it because I sewed that neckband some 7 times before I got it "right" only to find out it just...wasn't right. That and the holes aren't exactly the same. I think it would turn out better if I tried making it again, but I don't know that I will.

Anyway, that's my report for now. And due to, well, family things I may be traveling soon and don't know if I'll get a chance to make something worthwhile for a couple more weeks. But I will do my best.

Monday, November 1, 2010

Pancake Muffins with Bacon Buttercream

Intriguing, no? That's what I thought.

When I first saw this recipe I thought "Garrick would love this! Pancakes and bacon?? IN A PORTABLE CONTAINER?!" It's like a McGriddle without the egg and slightly fewer calories. Maybe.

Pancake Muffins with Maple Bacon Buttercream
Yield: 12 cupcakes

Prep Time: 20 minutes | Bake Time: 10 minutes

For the Cupcakes:
2 cups all-purpose flour
1 tablespoons granulated sugar
2 teaspoons baking powder
1 teaspoon salt
1½ cups whole milk
2 eggs
1 ounce (2 tablespoons) unsalted butter, melted and cooled

For the Frosting:
8 ounces (1 cup) unsalted butter, at room temperature
2½ cups powdered sugar
3 tablespoons maple syrup
1 teaspoon vanilla extract
3 slices of bacon, cooked, cooled and crumbled

1. Preheat the oven to 400 degrees F. Line a standard muffin pan with liners and then spray the liners with non-stick spray (important step!).

2. Whisk together the flour, sugar, baking powder and salt in a large bowl; set aside. In a separate medium bowl whisk together the milk and eggs, then stir in the melted and cooled butter. Add the milk mixture to the dry ingredients and whisk together until just moistened and combined. Like pancakes, lumps are okay! Divide the batter between the muffin cups and bake until puffed and firm to the touch, about 10 minutes. Let cool for about 5 minutes and then remove cupcakes to a wire rack to cool completely.

3. To make the frosting, use the whisk attachment of a stand mixer to whip the butter on  medium-high speed for about 5 minutes, scraping the bowl as needed. Reduce the mixer speed to low and add the powdered sugar a little at a time, waiting until it’s mostly incorporated before adding more. Once all of the powdered sugar has been added, scrape the sides of the bowl and increase the speed to medium-high and whip until fluffy, 1 to 2 minutes. Add the maple syrup and the vanilla and whip for another minute or so to incorporate. Add the bacon and mix to combine. Using an offset spatula, spread the frosting on the cupcakes. Top with additional crumbled bacon if desired.


I thought they were pretty good, though there was a bit more frosting than I care for but that's ok. Garrick, surprisingly, wasn't all that impressed. I think he thought the frosting was too sweet, which might have been my error because I was only making 1/2 a batch but accidentally put in the full amount of syrup. Oops.

I made Garrick take the last 4 to work to give away. The overall response was "Hmmmm....interesting." I don't know if that's good or bad.

If you're in the mood for something a little different, definitely give this a try.

Thursday, October 28, 2010

Allow me to explain

Reason number 1 for my unintentional hiatus was discussed in my last post: my lack of desire to write or do anything for that matter.

Reason number 2 is: my new toys :)

Meet my brand new Janome Sewist 500:

Isn't it beautiful? I'm so proud.

And finally, the little thing I'm so excited to try out:
My automatic buttonhole foot! I haven't tried it yet, but I will soon!

I was also distracted by the purchase of my new duvet cover/sham set. It made me want to never get out of bed.
Isn't it purdy? I can't say it was worth what I paid for it, though. But whatever. It looks nice, I think.

So there you have it! My latest purchase/endeavor. Once I have a little photo shoot I'll show you some of the wonderful things she's made. And so quiet! And smooth. It's a dream.

Monday, October 25, 2010

Sweet Baby Jesus


I’m making a relevant post. Right now. After 4 weeks.
Yeah, sorry about that. I think I have been/still am a little depressed. Dunno why, all I know is that I don’t have much desire to do anything and feel lonely a lot. Lately,with a few exceptions, the only reason I actually do anything is because I'm either doing it for someone else, or because I know I have to. Therefore, I haven’t had much desire to write or make anything. But I’m making myself post because you deserve it and because I do things for other people.
Several weeks ago I made these donut muffins from Sugarcrafter.

I was really excited about them, but I have to say, they didn’t quite live up to my expectations. They tasted fine, mostly like cinnamon, but I didn’t find them very donut-like. Like, at all.

Buster (the cat) liked them. Seriously. he licked one. Don't worry, I ate that one.
I cannot say that they were bad. They weren’t. They just weren’t what I was hoping for, either. See, I’m a big lover of cake donuts so I thought “A muffin version?! Hells yes!” But that’s really not what they’re like.
 
I would say give them a try and see what you think. Don’t take my word for it.  

Monday, October 11, 2010

Sorry

I realize that I haven't posted in over 2 weeks.

To be honest, it's not because I have nothing to post. It's just because I don't really feel like writing. I've hardly been on the internet.

Hopefully this weekend I'll have the time and motivation to post about the soup, bread, cupcakes, muffins, cake, and dress I've made.

Just wanted to let you know I haven't forgotten about you.

Saturday, September 25, 2010

I GOT A NEW SEWING MACHINE

I'm so excited. Until now I've been using my mom's old Viking machine. Don't get me wrong, it's a solid machine but it's never been serviced and it kept jamming on me. And it was time I got my own anyway.

SO I got a Janome Sewist 500 (see here: http://www.amazon.com/Janome-Sewist-500-Machine-Stitches/dp/B003AXXWAE). It's got a 1-step automatic buttonhole feature(!!!). It's manual, not electronic, which I did on purpose because electronic things tend to be finicky and if one thing goes wrong the whole thing is messed up. I just don't trust it.

My understanding is that Janome is a pretty solid brand, so I hope I chose well. Now, I just need to find a table to sew on...

Thursday, September 23, 2010

Chicken Chilaquiles

Simple, tasty, and great for lunch. I'm always looking for something I can easily pack away to take with me for lunch at work. It's especially great if one batch will make several meals so that I can freeze them and eat them when I'm in a rush. Enter: chicken chilaquiles.

Before anyone says anything, I realize this is not even close to authentic. I don't care. It's tasty and that's all that matters to me.

Here it is, all ready to go in a container for my lunch.

Chicken Chilaquiles
1 2 lb rotisserie chicken, meat removed and shredded
2 Tbsp olive oil
1 large can whole tomatoes in puree, pureed in food processor
1/2 small can green chiles
4 gloves (about 2 tsp) minced garlic
1 small yellow onion, diced
1 cup chicken stock
1 tsp cumin
dash of chipotle chile powder
1/4 cup fresh cilantro, chopped
salt and pepper

1. In a large pot, heat olive oil over medium-high heat. Add onion, and cook until softened, about 3 minutes. Add garlic and cook, stirring often, until fragrant, about 1 to 2 minutes.
2. Add the processed tomatoes and green chiles. Bring to a boil.
3. Add chicken stock, cumin, chile powder, salt, and pepper. Simmer for about 10 minutes. Add chicken and cook until the chicken is hot, about 1 minute. Add cilantro and stir.

Now, traditionally you serve this over a bowl with tortilla chips. I don't like soggy tortilla chips so I just scoop it out with a tortilla chip, using the chip as my utensil. It's delicious. You can also top it with sour cream and/or cheese.

Also, like most soups and stews, this is better the next day because the flavors get a better chance to meld. So if you can, make it in advance and eat it later.

Monday, September 20, 2010

I need some advice

I want to get my own sewing machine, but I don't really know what a good sewing machine is. I know Vikings are really good, but super expensive.

I'm looking for 3 things in my sewing machine:
1. It will last for many many years
2. It has an automatic 1-step buttonholer (I hate button holes)
3. It doesn't cost more than, say, $350.

Does anyone have any suggestions? I've found some that match this, but I'm nervous just plunging in without knowing more.

Joy of Joys

Let's get the meeting started. My name is Jennifer, and I am a coconut addict. I know that I have no control over my addiction. I know that I cannot have only on Almond Joy. Or only one piece of Almond Joy cake.

Which reminds me. Almond Joy cake is probably my favorite cake ever. Take a moment and put aside your feelings toward coconut if they are not favorable, because this cake has changed people's minds.

It's sweet and kind of gooey and delicious and satisfying and anything you could want from your cake. Even if you don't like coconut. (By the way, we can't be friends if you don't. I just don't see it working out.)


Almond Joy Cake
1 box chocolate cake mix (or devils food or what have you)
1 can condensed milk
1/2 can coconut cream (found in the drink mix isle)
1 regular container whipped cream
1/2 bag coconut
1/8 cup sliced almonds
1/2 tsp almond extract
Chocolate bar for chocolate shavings, if desired.

1. Bake cake in 13 by 9 inch pan as directed on the box. Allow cake to cool.
2. When cake is cool, take a straw and poles lots of holes in the cake. Suck cake out from straw (that's the  best part. And yes, you have to do that part. It's part of the recipe). Mix the 1/2 can of coconut cream (stir it real good because it separates) and can of condensed milk. Pour over the cake evenly.
3. Add almond extract to whipped cream and stir until combined. Spread over the top of the cake. Sprinkle with the coconut, almonds, and chocolate shavings. Store in the refrigerator.

I really do have an unhealthy love for this cake. I mean, it's beautiful. My mom used to make it when I was a kid, but I hadn't had it for probably 10 years when in college it popped into my mind and I had to make it. I don't know anyone who doesn't like this.


Even if you don't like coconut (seriously, we can't be friends) you should try this. It could change your mind (and you really should change your mind about it because I would like to be friends).

By the way, I apologize for not having prettier pictures. I just have a hard time justifying dirtying a plate just so you don't have to see the cake in the pan. And my camera is never around when it's on a plate. And, let's be honest, it doesn't stay on the plate very long.

Thursday, September 16, 2010

Gnocchi Mac n Cheese

Oh. My. God.

I know what heaven is.

Seriously. I don't think it gets better than this. Gnocchi mac n cheese. Are you serious? First of all, that's not even comfort food, that's last meal kind of food. Second of all, how did I not think of this myself??


I can't take credit for this recipe. Actually, my old roommate sent me this recipe because she knows how much I love love love macaroni and cheese. Honestly, my last meal would involve macaroni and cheese in some significant way.

Anyway. As I mentioned I made dinner Sunday night. I got this recipe Sunday morning, and it looked so amazing I made it Sunday night. Here it is. I got it from Noble Pig.

Gnocchi Mac n' Cheese
From Cuisine at Home

1 pound purchased or homemade gnocchi
2 Tablespoons butter
2 teaspoons garlic, finely chopped
1 Tablespoon all-purpose flour
3/4 cup milk
1 teaspoon Dijon mustard
1/4 cup shredded Gruyere cheese
1/4 cup shredded fontina cheese
Salt and white pepper to taste
1/3 cup shredded Parmigiano-Reggiano
Basil leaves for garnish, optional

1. Preheat oven to 375o F. Prepare gnocchi according to package directions.  Drain and place gnocchi in a single-layer in a 1-1/2 quart shallow baking dish that has been sprayed with nonstick spray.

2. Melt butter in a medium saucepan over medium heat.  Stir in garlic and cook until fragrant, about 30 seconds.  Whisk in flour until it thickens and bubbles, then whisk in milk and Dijon.  Continue to whisk mixture and cook until slightly thickened, about 3-5 minutes.

3. Combine Gruyere and fontina, then add by the handful to milk mixture, stirring until melted before adding the next handful.  Once all cheese is melted, season sauce with salt and pepper.

4. Pour sauce over gnocchi and sprinkle with Parmigiano-Reggiano over top.  Bake gnocchi until they puff and cheese is golden and bubbly, about 25 minutes. Let gnocchi rest for 5 minutes before serving.

 I'll be honest: I doubled the amount of cheese in every instance. And it turned out MAGNIFICENT. I will say, though, that these cheeses aren't readily available in my area so I had to get the imported (read: expensive) cheeses which ended up costing me about $22. So just be aware of that.

Do you see it bubbling? That's a sign of brilliance.

The finished product. I got to use up about half of the rest of the gnocchi I made and froze. We ate it with grilled chicken and simple steamed green beans.
And even though the chicken was marinated with olive oil, garlic, and lots of fresh rosemary and cooked to juicy perfection, it still paled in comparison to the gnocchi.

I seriously can't get over it. Save up some money and give it a try because it will change your life.

Monday, September 13, 2010

Oh Boy.

Whew. The last few days have been...busy.

Let's start with Friday. Mom stayed home sick on Friday. After work I was with Garrick and we had dinner, dessert, and a movie since it was date night. After the movie, around 9 pm I text my mom to see how she's feeling. Then I get a call from dad saying they're in the minor emergency. Turns out mom stayed home because she had been having pains in her side all night and couldn't sleep. But the pain was just getting worse. After 4 vials of blood, a urine sample, and a CT scan, it was determined she had appendicitis and would have to have her appendix out that night. This wasn't determined until around 12:30 am, she was transported to the main hospital around 1 am. At 2 am I went home to get some sleep (I had been up since 5:30 am that morning). Got home around 2:30. Showered, got to bed around 3. At 6 am dad calls to say that mom is going into surgery. At 8:45 he calls and says she is in recovery and when can I come with her requested breakfast drink. So after being up half the night, and not sleeping well I got up, got ready, and went to the hospital where I stayed until about 1 when I had to take Garrick back to his car so he could go to work.

I took a nap, then started cleaning. Usually mom cleans the upstairs and I clean the downstairs, but obviously mom wasn't going to be able to do any cleaning which means it is up to me. I don't mind, it's just that the house is some 4,000 square feet, which takes a long, long time to clean. That's pretty much all I did until about 8 when my friend and her boyfriend came over. Mom got to come home that night and she made it back around 9 pm.

Sunday I got up and made breakfast (pancakes, bacon, poached eggs). Then more cleaning. Then errands. Then cook dinner. Then more cleaning.

So anyway. Interesting and busy weekend. Which means my posts for the week aren't done, and to be honest I didn't put much thought into them.

So for today I'll give you my go-to recipe for pancakes. No Bisquick allowed.

Pancakes
1 1/2 cup all-purpose flour (for a healthier alternative, use 3/4 cup white and 3/4 cup whole wheat flour)
1 1/4 cup milk
3 1/2 tsp baking powder
1 Tbsp sugar
3 Tbsp melted butter
1 tsp salt or less

Combine all ingredients. Pour out 1/4 cup per pancake and cook on a griddle or skillet. I like to use utensils to cook them in the shape of a heart or cloud. Sorry to say I don't have pictures (like I said, I wasn't all that focused on my blog this past weekend). This makes about 10 pancakes.

Honestly, though, pancakes were one of the first things I learned to make and I have tried so many different recipes, and this is the one I like best. It has an almost sugar cookie taste, but has hardly any sugar. It's just darn tasty. Oh, and super easy. I don't even see the point in using Bisquick because pancakes from scratch are just about as easy. That said, if you really like the flavor of Bisquick, add about 1/3 cup of malted milk powder to the batter.

Oh, and if you've never made a poached egg, you must. The texture of them is superior to any other way you could cook an egg. What you want to do is get a large pan mostly full of water to a very low simmer (anything more than tiny bubbles and you risk break your yolks). Add about 1 to 2 Tbsp white vinegar - this changes the pH of the water and helps keep the whites together. Crack 3 eggs into a mug (use several mugs if you want more than 3). When the water is barely simmering, pour your eggs from your mug(s) into the water, cover the pan, remove from the heat, and let it sit for 5-7 minutes until the whites are set but the yolk is still soft. This is a really easy technique that works really well.

There you go. Longest post every about breakfast. And you witnessed it.

Thursday, September 9, 2010

Dark Chocolate Brownies

I know you're already starting to drool at the title.

And for those of you who say "I don't like dark chocolate" trust me, these will make you a believer. I personally love dark chocolate. And when I say dark chocolate I mean like the Hershey's version that's just slightly darker than milk chocolate. I tried some 84% cocoa chocolate the other day, and that was just too bitter for me.

Back to the task at hand. This is our contribution to dinner with Megan and Caleb. Speaking of which, we've been sucking lately. We've had to bail on them twice because of scheduling conflict. Now our Thursday dinners have become Wednesday dinners but it looks like Garrick might have to start working on Wednesdays (KWCH: you ruin my life). So maybe it will have to become Saturday lunch or something.

ANYWAY. Let's just get to the recipe.


Dark Chocolate Brownies
1 cup + 2 Tbsp unsalted butter
7 oz 70% cocoa chocolate
3/4 cup cocoa powder, sifted
1/2 cup all-purpose flour
1 tsp baking powder
1 3/4 cup sugar
4 large eggs

1. Melt butter and chocolate and mix until smooth (Ideally do this in a bowl over simmering water; I'm impatient and do it in the microwave but just know you have a greater risk of burning the chocolate or making it separate)
2. Combine dry ingredients. Add to butter/chocolate mixture
3. Beat the eggs and mix with the rest of the batter. Rather than stirring it until it becomes smooth like usual, just let it rest for 5-10 minutes - that will allow things to break down. Give it a final stir to make sure everything is smooth.
4. Bake for 25 minutes. The brownies should be set at the edges but still gooey in the middle.


Please note: these are NOT like box brownie mix. They will be less "done" than those brownies usually are. That's a good thing - it makes them so much more fudgey and delicious.

Having just finished making them, I can just say that I always forget just how amazing these are. Seriously, I almost couldn't make myself stop testing the batter for quality control.

...

Anyway. I really do recommend that you try this recipe. I like "box brownies" as much as the next person, but nothing can beat these, except maybe continuing to wear your skinny jeans because they won't fit after this.

P.S. I'd like to know: if you've tried any of the recipes I've posted, leave a comment and let me know how you liked it. Also, I'd like to know what readers want: more recipes? More posts? More sewing? More crafts? More tutorials? More personal thoughts? I get a lot more hits than I do comments so I'm interested to know what readers think and want from this little site.

Tuesday, September 7, 2010

Banana Muffins

Usually I post on Mondays, but Monday was Labor Day and you're not allowed to work on Labor Day. So I didn't.

But I'll post today.

Don't you hate seeing food go to waste? And doesn't it seem like bananas get a little too ripe before you can possibly eat them all? This is where a good banana muffin recipe comes in handy. Not only are they tasty and freeze really well, but they're really easy to make. Now you don't have an excuse to throw out those dark bananas.


Banana Muffins
makes 10-12 muffins


3-4 ripe bananas, mashed
1/3 cup melted butter or margarine
1/2 cup sugar
1 1/2 cups all-purpose flour
1 tsp baking powder
1 tsp baking soda
1 egg, slightly beaten
1/8 tsp salt
Pinch of cinnamon

1. Mash the bananas with a fork and mix with the melted butter. Add egg and sugar.
2. In a separate bowl, combine flour, baking powder, baking soda, salt, and cinnamon. Add to banana/butter/sugar/egg mixture.
3. Put about 1/4 cup of batter in each muffin cup. Bake at 350 for about 20 minutes.
4. Now here's the trick to make the muffins stay extra moist: rather than have the muffins cool on a cooling rack, stick them in a gallon-size resealable bag, but don't close it. Leave them there until they cool, then seal the bag. You'll notice quite a bit of condensation - this is what keeps the muffins moist.


The whole thing with the resealable bag was something I found out on accident. I was running short on time and didn't want to throw out my bananas, so as soon as they came out of the oven I put them in a bag and left. What resulted were muffins with this almost gooey center, but were fully cooked. So delicious. The next time I made them I let them cool on the counter, and those muffins were much more dry. The next time I put them in a bag again and they were super moist and delicious.

These freeze very well. Just leave them in the resealable bag and throw them in the freezer. When you want on, just throw it in the microwave for about 30 seconds and you'll never know it was ever frozen.

By the way, this is the new house I keep talking about:
Well, the part that doesn't show the address anyway. I love having followers but I don't need anyone following that closely.

Also, the sky looked really neat a few minutes ago:

That's all for today. Check back on Thursday for the best brownie recipe ever.

Thursday, September 2, 2010

Delicious Side Dish

As promised, here is the recipe for the side dish we had with our steak tacos with sweet and spicy pickled onions which were oh so good.

It's called: Grilled Corn with Chili-Lime Cream and Cheese and Garrick didn't want it. He thought it sounded gross. I didn't see how this was possible. Luckily, I was able to prove him wrong.


Grilled Corn with Chili-Lime Cream and Cheese
as seen in Cooking Club Magazine August/September 2010 Issue

8 eat corn
1/2 cup mayonnaise
1/2 cup sour cream (or Crema Mexicana Agria)
1 Tbsp lime juice
1 tsp grated lime peel
2 cups grated cotija or Parmesan cheese
2 tsp anchi chili powder
1/2 tsp chipotle chili powder

1/ Peel corn husks to base of each cob, leaving husks attached. Remove silk. Remove 1 long piece of corn husk from each cob to use as tie. Pull husks away from corn; tie with piece of husk or string to provide a handle.
2. Soak corn in large pot or sink filled with water 20 minutes. Drain (corn should be wet but not dripping when placed on grill).
3. Meanwhile, combine mayonnaise, sour cream, lime juice, and lime peel in a small bowl; spoon into tall glass. Combine cheese and chile powders; spread on a plate.
4. Heat grill. Grill corn, covered, over medium heat or coals 8 to 10 minutes or until tender and beginning to char, turning every 2 minutes. (If you place a piece of double-thickness foil under the husks you'll protect them from charring too much) Cool 2 minutes.
5. Holding corn by husks, dip into mayonnaise mixture (I would scrape off some of the excess); roll in cheese mixture (I would sprinkle it on - it gets to be too much if you roll it).

And there you have it. And it was delicious. Seriously. The only thing is that corn season is pretty much over so you'd better try it while we still have a small supply of corn on the cob at stores!

Monday, August 30, 2010

I've returned!

Finally, things are starting to fall in place and I can get back to doing things I enjoy.

Because of scheduling issues, we didn't have our usual Thursday night dinner with Megan and Caleb last week, or this week until yesterday afternoon. Instead of dinner, we had Saturday lunch and swam in the pool. It was a great time.

I made steak tacos with sweet and spicy pickled onions and it was so very, very good.

Steak Tacos with Sweet and Spicy Pickled Onions
as seen in The Best of America's Test Kitchen 2010

Pickled Onions
1 red onion, halved and sliced thin
1 cup red wine vinegar
1/3 cup sugar
2 jalepeno chiles, seeds and ribs removed, cut into thin rings
1/4 tsp salt

Herb Paste
1/2 cup packed fresh cilantro leaves
3 garlic cloves, roughly chopped 
3 scallions, roughly chopped (about 1/3 cup)
1 jalepeno chile, seeds and ribs removed, roughly chopped (leave ribs and seeds for more heat)
1/2 tsp ground cumin
1/4 cup vegetable oil
1 tablespoon fresh lime juice

Steak
1 (1 1/2 to 1 3/4 lb) flank steak, trimed and cut lengthwise (with the grain) into 4 equal pieces
1 Tbsp kosher salt or 1 1/2 tsp table salt
1/2 tsp sugar
1/2 tsp pepper
2 Tbsp vegetable oil

1. For the pickled onions: Put onions in a heatproof bowl. In a small saucepan, put red wine vinegar, sugar, jalepeno, and salt over medium-high heat, stirring occasionally, until the sugar dissolves. Pour the vinegar mixture over the onions, cover loosely, and let cool to room temperature, about 30 minutes.Once cooled, discard the liquid.
2. For the herb paste: Place all ingredients in a food processor and combine until it resembles pesto. Transfer 2 tablespoons of the paste to a medium bowl; whisk in the lime juice and set aside.
3. For the steak: With a dinner fork, poke each piece of the steak 10 to 12 times on each side. Place in a dish. Rub all sides of the steak pieces evenly with the salt and then coat with the remaining herb paste. Cover and refrigerate at least 30 minutes, and up to an hour.
Scrape herb paste off of the steak. Sprinkle all sides evenly with the sugar and pepper. Heat oil in a nonstick skillet over medium-high heat until just smoking. Brown the steak in the skillet about 3 minutes. Flip and cook another 2-3 minutes. Use tongs to stand the meat on its side and cook every side, turning as necessary. (Alternatively, as we did, grill the steak for about 4 minutes per side.) Transfer steak to a cutting board and let side 5 minutes. Slice the steak 1/4 inch thick across the grain.

To assemble: Put some of the set aside herb paste on the tortilla and spread it around. Then pile steak and pickled onions. Enjoy.

Looking back, we skipped a few steps on accident. But it still tasted really good. I think this is one of those recipes that you can screw up pretty well and it will still turn out tasty.

Sorry about the lack of pictures, I'm still not sure where I put everything during the move, and that includes my camera. But at least I posted something :)

Next time I'll post the recipe for the side dish we had with this. Yummy.

Tuesday, August 24, 2010

Short update

I finally have a functional bed. I actually get to sleep in my own bed tonight. I so look forward to that. I haven't slept through the night since we moved to the new house because of a) being uncomfortable on a rapidly deflating bed, and b) being displaced. I'm pretty tired.

I have Open House at school tonight until 9. No one is really looking forward to it, but it's a necessary evil. When I get home, I'm showering and going to bed. The end.

My closet is still not functional. Leak has now (hopefully) been fixed for good, but I still have a hole in the wall of my closet that needs patching and painting before it's completely usable.

Otherwise, I'm pretty much moved. I have a few things in the garage still that I'll get to, but not today.

That's all for now.

Tuesday, August 17, 2010

Let me explain

Normally I do my posts for the week on weekends and set them up to post throughout the week, usually Monday and Thursday. I wouldn't count on anything but this for this week. Let me explain why:

1. I've started my new job teaching special education. That means stress and exhaustion on a level I've never felt before.Did I mention that I'm a floating teacher, meaning every class I have is in a different room and I have to run everywhere with my cart of stuff? Yeah.
2. I just moved into a new house. And by moved, I mean about half my stuff is here, my bedroom furniture is being delivered Thursday (minus one piece which is back-ordered, which I just found out about today - awesome). Also, my queen bed, the one that I've been waiting and waiting to move into this house so I can use it, has a leak in BOTH sides (it's a sleep number, so it has air chambers. Except now they don't work). So, as of right now, I'm sleeping in a guest room, about 1/4 of my clothes are in my closet, which is another story, I work at the desk in my room, most of my stuff is still in crates waiting for my furniture to arrive, while the rest of my clothes are at the old house or in my old dresser, which is upstairs in a guest room. In short, my stuff is everywhere, and so am I. I don't have a usable room at the new house, I don't have a usable room at the old house, I don't even have a classroom. I'm very displaced.
3. On top of all of the other issues above, my closet (you know, the only usable thing in my room besides my desk) has the carpet pulled up and a fan blowing on it. Turns out the leak that lets water into my closet that's been an issue a few times in the past, still hasn't been fixed despite numerous different attempts to fix it.
4. On top of everything else, I've hardly seen Garrick. He's been working more than ever - like 70 hour weeks. Not only do I not see him, but when I do he's usually grumpy because he's tired of working. Can't blame him for that. But it sucks because I have so much going on and he's my biggest support, and he can't be here for me when I need him more than ever.

There's more, but I'm tired of complaining. I told my mom today that no one is allowed to talk to me unless they have good news. I don't think I've gotten good news in some 3 weeks, but a whole flood of bad news. I'm just over it.

So anyway, my stuff is everywhere so I have no recipes to offer and I have no clue where the sewing machine is, and quite frankly I don't have the time to use it right now. Hopefully next week things will be slower and I can resume regular posting.

Thursday, August 12, 2010

Oriental Apricot Chicken

Yummm. I love love love this recipe. It's one of Garrick's and my standby recipes. It's really easy to make and tastes so good. All you need to go with it is a bit of rice (we like Botan brand). I guess if you really want a vegetable you could cook up some bok choy with some soy sauce and rice vinegar. But I just stick with rice.

Since we didn't have our usual Thursday night dinner with Megan and Caleb last Thursday, Garrick and I made this recipe. And then right as we were about to plate up, my parents called and asked if we wanted to join them at our favorite Chinese restaurant. Hmmm, homemade Chinese food or authentic Chinese food? What a dilemma. We went for authentic, and packed up our original dinner when we got home. Garrick got stir-fry noodles, and I got lemon chicken, which is weird because I almost always get Sha Cha Chicken. It's sooo good. I've never seen it anywhere else. It's pieces of chicken with carrots, celery, and green peppers (I get it without the peppers) with a spicy, flavorful, kind of garlicy sauce. It's amazing.

Anyway, back to the recipe. The pictures don't make it look that appetizing, but we were in a hurry to get to our dinner, so we didn't do any "staging."


Oriental Apricot Chicken
 • 4 boneless skinless chicken breast halves
• 1 lb. canned apricot halves in syrup, drained, halved, liquid reserved
• 1 Tbsp soy sauce
• 1/8 tsp Oriental sesame oil
• 1/4 cup sherry
• 3/4 cup all purpose flour
• 1 tsp. paprika
• 1/4 tsp. cayenne pepper
• 6 scallions, including some green, chopped into 1/2 inch pieces
• 1 tsp. sesame seeds (optional)
• 3 Tbs. fresh cilantro, chopped (optional)


Place chicken between two sheets of wax paper and pound lightly with a mallet or other heavy flat object to flatten to 1/2 inch thickness. Combine reserved apricot liquid with soy sauce, 1/8 tsp. oil and sherry in a bowl. Set aside. Combine flour with paprika, cayenne and salt and pepper to taste in a shallow dish. Dredge chicken in flour mixture to coat, shaking off excess. Heat 2 Tbs. oil (peanut or vegetable) in a heavy nonstick skillet over medium high heat. Sauté scallions 2-3 minutes, until lightly browned. Transfer with a slotted spoon to a bowl. Add chicken and cook 3 minutes, until browned. Turn chicken, reduce heat to medium low, and add cooked scallions and apricots. Drizzle with sherry mixture. Cover skillet and simmer 5 minutes, turning chicken once. Serve with sauce and sprinkled with sesame seeds and cilantro.


It's such a simple recipe but it's so tasty. 

Seriously, the next time you don't know what to make but you want something quick, you really should give this a try.

Monday, August 9, 2010

I Have Conquered

The world of dressmaking. And bound buttonholes. Yes, last week I made, for the first time, a dress. I've made skirts and pants and vests, but never a dress. Oh, and I've made bound pockets before except I didn't understand the directions so they ended up looking nothing like a bound pocket, but more like a mess of thread surrounding what should be a pocket. Poor Garrick still thinks the world of his pants.

But back to the dress. I was inspired to make a dress when I found this etsy seller. I love love love vintage clothes, so when I found vintage patterns at prices below what I would pay for a contemporary pattern, I got excited. I bought 3. I wanted to buy 5, but thought maybe I should have a little self control. Just a little.

So my dress for today was made using this 1966 pattern:
Thus I made my first attempt at dressmaking and princess seams (don't you love their hair? I'm getting my hair cut on Wednesday and I'm tempted to cut it like the girl on the right). I made the one in the middle, with one modification. Rather than the bow underneath, I changed it and moved it up (more explanation on that later), and made a detached matching belt, just to break up the bright blue. Here is the finished product:


It certainly isn't perfect, but I quite like the way it turned out. It's comfortable and form-fitting and, I think, flattering.


The bow is also removable. That way you can tie it different ways, use different colors, or have something else there.


I got the idea for the bow from a dress in the movie Down With Love. If you've ever seen that movie, it's the yellow dress Catcher Block's secretary is wearing in the very beginning. I tried to find a picture, but it's not an important scene, so no picture. Anyway, I've always liked it. So, since I had a 1960s pattern I figured it would be a good time to try and make my own version of it.


I made the slits for the bow like I was doing a bound pocket or button (correctly this time). Then I just sewed up a strip of fabric, tied it, and slipped it in. The belt is just a sewn strip of fabric with two 1/2 in strips of elastic at the back so it can slip on and off easily. It's not perfect, but it'll do.

I'm excited to make my next 2 dresses. I already have the fabric cut out for them, but I'm getting into crunch time with school. Freshmen start on Friday, and I feel totally unprepared. Like I said before, I'm going to try and keep up with blogging as much as possible, but I just don't know what the demands of my job will be.

Thursday, August 5, 2010

A Nice Ego Boost

As mentioned previously, it was Garrick's and my turn to host Thursday night dinner with Megan and Caleb, and I planned on making a chilled cucumber watermelon soup, pan-broiled steak with bearnaise sauce, potato balls sauteed in butter, and green beans. And that's what I did. It was SO GOOD. They particularly enjoyed the potatoes and steak. I think I remember hearing something like "This is the best steak I've ever had." You know, something like that. I get such a good ego boost when I cook for them.

By the way, this is Megan and Caleb:
Aren't they the cutest newlyweds ever? And they're the nicest people I know. And that's not an exaggeration. I love being around them.

Okay, back to the food.

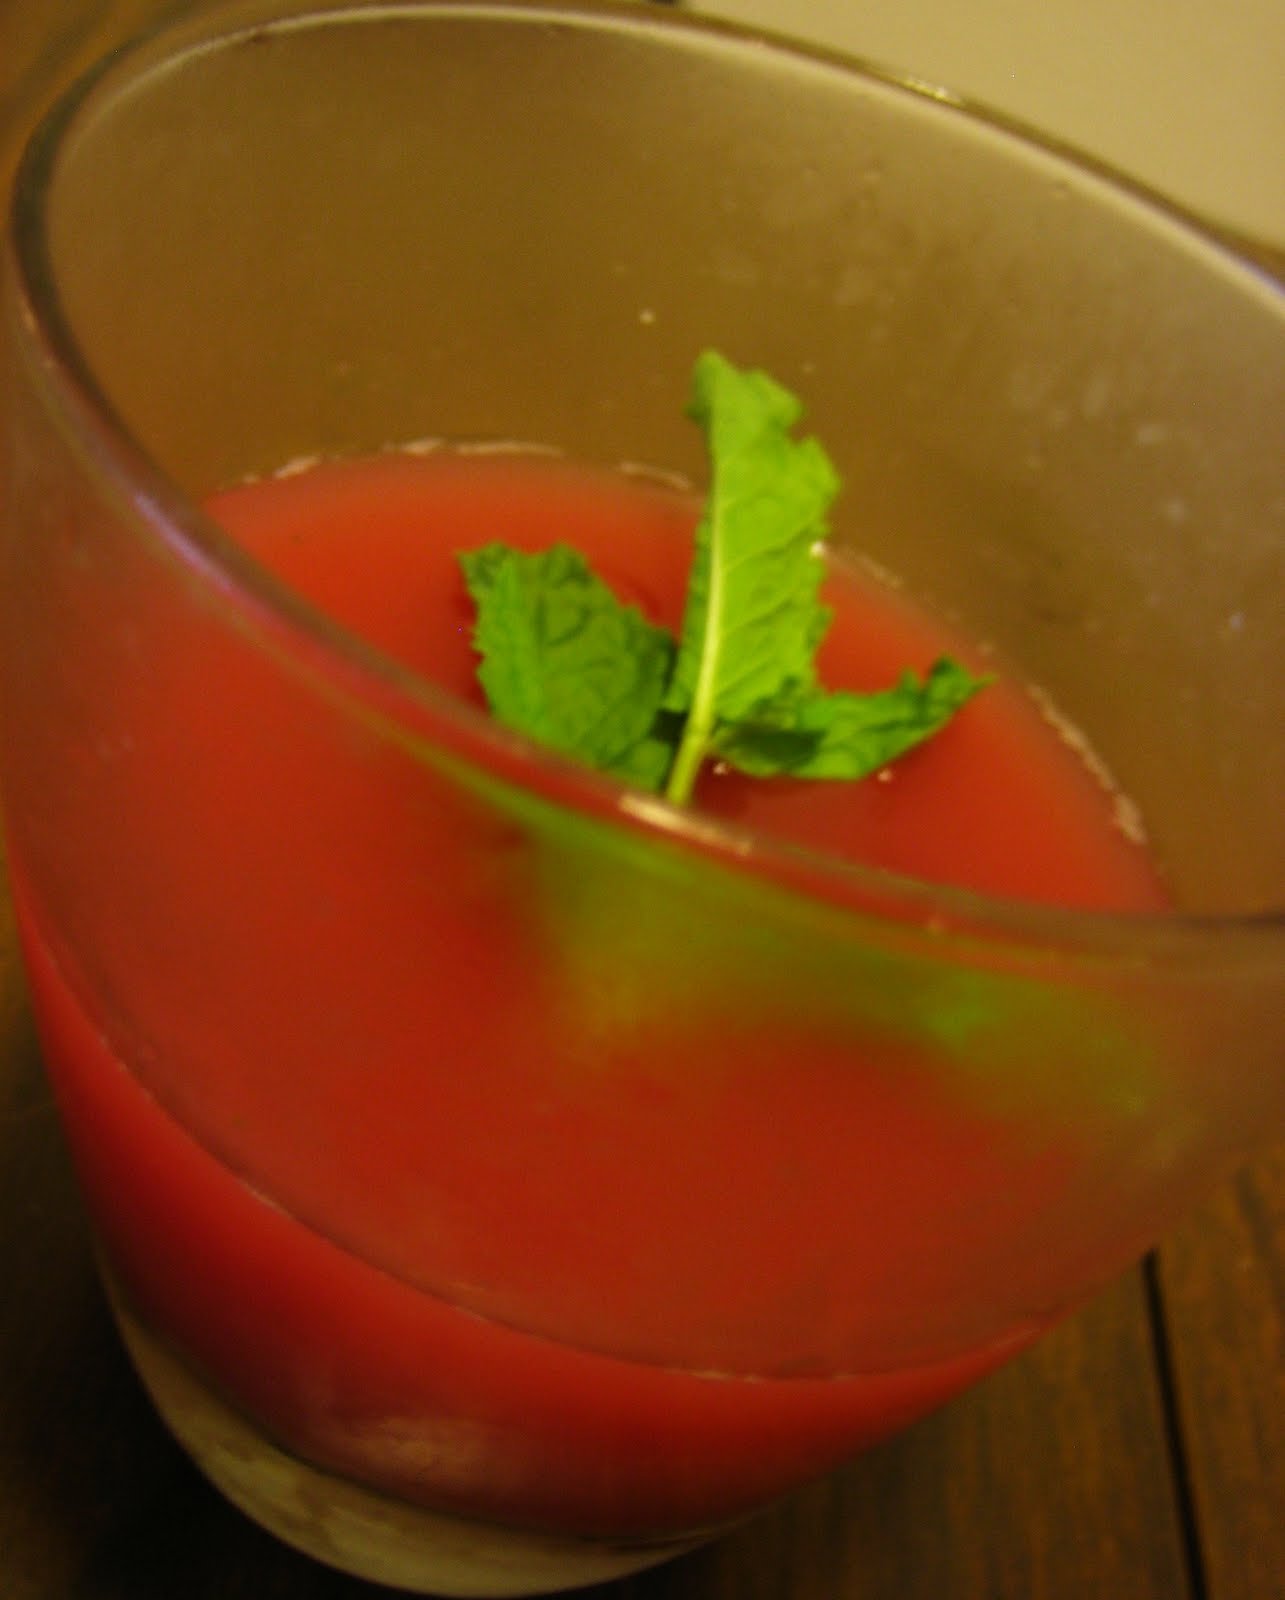
Cucumber Watermelon Soup
1 cucumber, peeled, de-seeded, and chopped
5 cups seedless watermelon, cut into chunks
1 Tbsp lime juice
2 Tbsp fresh mint, chopped
pinch of salt

1. Blend all ingredients together until smooth. Correct seasoning. Optional: strain soup through a fine sieve. I did this because I wanted to make sure there weren't any seeds. Chill for several hours.

Now on to the main course!


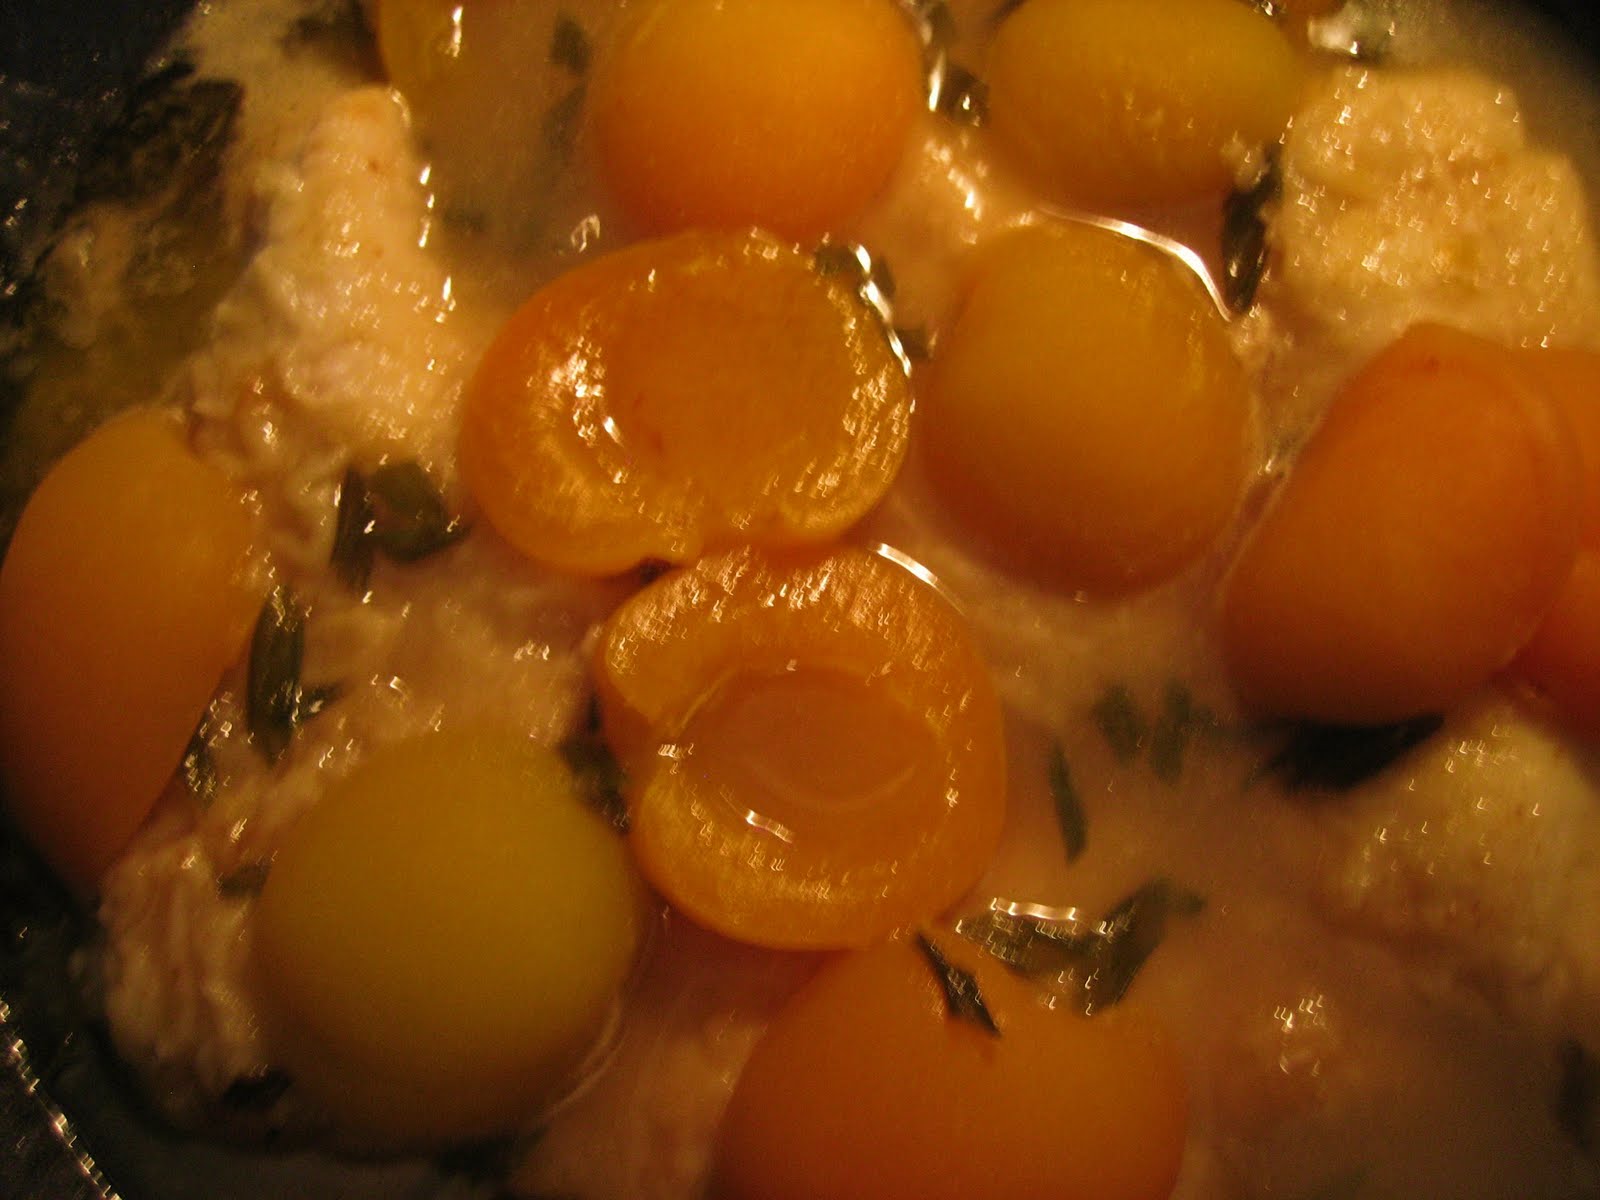
For the steak, I created my own marinade with oil, red wine vinegar, white wine vinegar, dry white wine, soy sauce, worchestershire sauce, Mrs. Dash, minced garlic, minced dried onion, and seasoned pepper. Then I marinated the steak (I used sirloin) for about 4 hours.

To cook the steak, put 1 Tbsp butter and 1 Tbsp oil in a skillet, and cook the steaks for 4-5 minutes per side.

Bearnaise Sauce
From Mastering the Art of French Cooking
1/4 cup wine vinegar
1/4 cup dry white wine
1 Tbsp minced shallots
1/2 Tbsp dried tarragon (I used thyme)
pinch of salt and pepper
3 egg yolks
2 Tbsp cold butter
1/2 to 2/3 cup melted butter

1. Boil the vinegar, wine, shallots, herbs, and seasonings over moderate heat until the liquid has reduced to 2 tablespoons. Let it cool.
2. Beat the egg yolks until thick. Strain in the vinegar mixture and beat. Add 1 tablespoon of cold butter and thicken the egg yolks in a double boiler (a heat-proof boil set over a pan of 1/2 inch of barely simmering water). Beat in the other tablespoon of cold butter, then the melted butter by droplets. Correct seasoning. Serve in a warmed gravy boat.

For the potatoes:
Peel 2 russet potatoes per person, and use a melon baller to cut balls out from it. Melt 1 1/2 tablespoons of butter in 1 1/2 tablespoons of oil in a skillet over medium heat. Put potatoes in skillet, and leave them for 2 minutes. Shake the pan to turn the potatoes, and leave another 2 minutes. Continue doing this for the next 4-5 minutes. Add salt and pepper, and shake the pan to cover the potatoes. Reduce the heat, cover, and cook for 15 minutes, stirring occasionally.


For the green beans, I just steamed them, shocked them in cold water to stop the cooking, then threw some butter in the still warm pan, and sauteed 1 tablespoon of shallots until opaque, then threw the beans back in and stir to coat in butter and shallots.

Dinner was delicious, if I do say so myself. And so was dessert!

Megan and Caleb brought a delicious peach and strawberry crisp.

Which was a lot more tasty than the picture shows. Garrick also put his new toy, his espresso machine, to good use making all of us personalized drinks.


While we ate dessert, we watched Cinderella Man. It was a great night. We have to skip next Thursday because Megan and Caleb will be at a family reunion, but I'm looking forward to the next one, when we will be bringing dessert.