
For 6 days. To the Land of Dial-Up Internet. That means no posts for the next week.
I would do it before I leave, but I have too much to do and have been too busy to post the last few days.
But I promise to post The Crochet Tutorial Part II when I get back. See you then!
Thursday, June 24, 2010
Sunday, June 20, 2010
Crochet Tutorial, Part 1
Here it is (finally!): The Afghan Tutorial, Part 1.
First thing's first: make sure you have all of your supplies. You'll need a 5.5mm afghan hook (it must be an afghan hook, regular ones aren't long enough for this project), and one regular 5.5mm crochet hook, 6-7 7 oz skeins of your main color, and 2-3 of your coordinating or accent color. When it comes to yarn, it's best to use one with no dye lot (it will say that on the paper around the yarn) in case you need more, you want to make sure you can get the same color.
 I chose dark brown for my main color, and a light, bright blue for the accent.
 There are two places you can pull your yarn from. Pull it from out of the end, not the side. This will save you a headache in the longrun. Sometimes it's a bit knotted at first, but untangles easily.
Now, the knot. Take the end of your string, and fold it over, like so:
 Take a hold of the ends.
 Take the open end of the yarn, and loop it around the long end.

 Then take the end and put it through the loop.

 Pull to tighten it.
 Put the loop around your hook and pull it tight.
 Hold the rest of the yarn in your hand like so. It will keep the yarn in place.
 Put your crochet hook under your yarn, and make sure it will stay in the "hook" part.
 Pull the "hooked" loop through the loop your made with your knot.
 Now you have a new loop.
 Repeat the process of catching the yarn and pulling it through the loop to make a new loop until you have made 24 loops. This is called a chain, and it looks like a braid.
 Put your crochet hook through the top of the 2nd closest "braided"piece (look at the colored lines to better explanation)
 Hook your yarn again, and pull it through where you just put your hook.
 Now you should have 2 loops on your hook. Keep repeating this process for each braided piece, until your hook looks like this:

 When you have made all of your loops, hook your yarn and pull it through the last loop you made.

 Then, hook your yarn again, but this time you're going to pull it through 2 loops.

 Keep hooking your yarn and pulling it through the next 2 loops until you get to the end. It should now look like this:
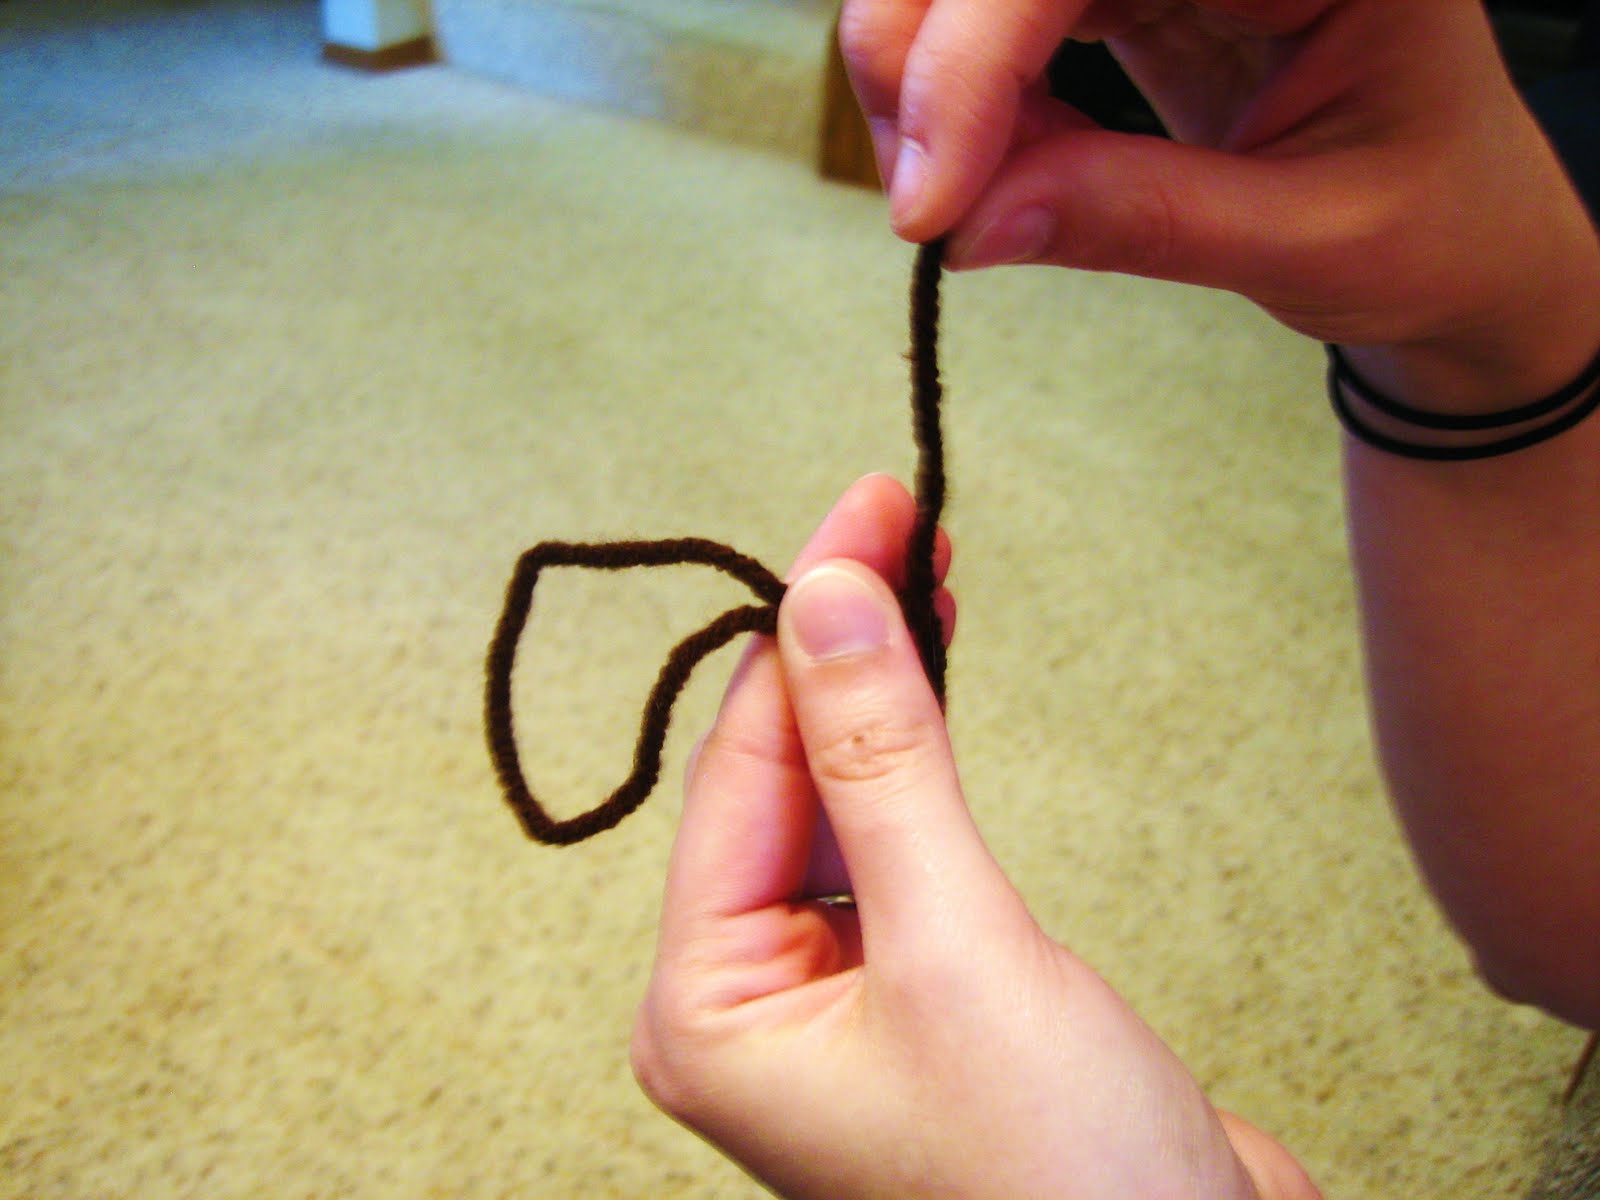
 Now you'll make loops like you did before, only this time you'll put your hook through the straight lines created by the loops you made before. (the bluish/purplish line in the above photo shows you which "line" to put your hook through to make the first loop).

 Again, you'll hook your yarn and pull it through, making loops until you reach the end again. This time, how you deal with the end is a little different; more complicated, and more difficult to explain. I hope the pictures help with this area.
 See the bluish/purplish line, and the green line? You're going to put your hook through both of them.


 Now you'll hook your yarn and pull it through the 2 loops you just put your hook through (the bluish/purplish and green lines)


 Then you'll hook your yarn and pull it through the loop you just made.

 Now you'll do like you did before, hooking the yarn and pulling it through two loops to the end.

 Repeat the process of making loops and crocheting them off until you have 223 rows (one set of loops across and crocheting them off is one row).
When you have made your 223 rows, you'll finish it off by doing a single crochet across the top. A single crochet works like this: Make a loop like usual - you should have 2 loops on your hook.
 Then hook your yarn and pull it through the 2 loops.


First thing's first: make sure you have all of your supplies. You'll need a 5.5mm afghan hook (it must be an afghan hook, regular ones aren't long enough for this project), and one regular 5.5mm crochet hook, 6-7 7 oz skeins of your main color, and 2-3 of your coordinating or accent color. When it comes to yarn, it's best to use one with no dye lot (it will say that on the paper around the yarn) in case you need more, you want to make sure you can get the same color.


Now, the knot. Take the end of your string, and fold it over, like so:


When you have made your 223 rows, you'll finish it off by doing a single crochet across the top. A single crochet works like this: Make a loop like usual - you should have 2 loops on your hook.


Repeat the process of making a loop, hooking your yarn, and pulling it through the two loops until you have made it all the way across. When you have finished, just make a loop through a piece of yarn at the end, then cut the loop in the middle, and pull the rest of the yarn away from your panel. Congratulations! You've just made most of a panel!
The next installment will be finishing off the edges and creating a design on your panel.
To make an entire afghan, you will make 4 panels of 24 stitches across and 223 rows long, and one panel that is 42 stitches across and 223 rows long. In the end, you'll crochet them all together (more on this later).
Happy crocheting!
Friday, June 18, 2010
Penne alla Vodka
Last night I invited Garrick, his sister, and her baby (Logan) over to dinner. I made "Skillet Penne alla Vodka" from The Best of America's Test Kitchen 2010. I love it because it's simple and tasty. The book says it serves four, but I usually get 5-6 servings out of it.
Skillet Penne alla Vodka
2. Heat the oil in a 12-inch nonstick skillet (I use a wok) over medium heat until simmering. Add the tomato paste, onions and 1/2 tsp of salt and cook until softened, about 5 to 7 minutes. Stir in the garlic and red pepper flakes and cook about 30 seconds (until fragrant). Stir in the processed tomatoes. Reduce heat to medium-low and simmer about 10 minutes (so that the tomatoes don't taste raw).
3. Stir in the water and vodka, then add the paste. Increase the heat to medium-high, cover, and cook, stirring often and adjusting the heat to maintain a rigorous simmer, until the pasta is tender, abou15 to 18 minutes.
4. Stir in the cream and cook until hot, about 1 minute (I usually take it off the heat to stir in the cream because the residual heat will warm the cream fast enough on its own), then add the basil and season with salt and pepper to taste. Serve, sprinkling with parmesan if desired.
Last night was probably the 3rd time I had made this, and I like it every time. It's very good with garlic bread and a salad. Ilene liked it too. Give it a try!
Skillet Penne alla Vodka
- 3 14.5 oz cans whole peeled tomatoes
- 2 Tbsp EVOO
- 1/4 cup minced onion
- 1 Tbsp tomato paste
- Salt
- 2 garlic cloves, minced (I use about 1 tsp minced garlic from a jar)
- 1/4-1/2 tsp red pepper flakes
- 2 cups water
- 1/3 cup vodka (the book recommends premium vodka because cheaper ones will taste harsh in the sauce, and pepper vodka can be used in place of plain for an extra flavor)
- 12 oz (about 3 3/4 cups) penne
- 1/2 cup heavy cream
- 2 Tbsp fresh chopped basil
- Pepper
- Parmesan cheese
2. Heat the oil in a 12-inch nonstick skillet (I use a wok) over medium heat until simmering. Add the tomato paste, onions and 1/2 tsp of salt and cook until softened, about 5 to 7 minutes. Stir in the garlic and red pepper flakes and cook about 30 seconds (until fragrant). Stir in the processed tomatoes. Reduce heat to medium-low and simmer about 10 minutes (so that the tomatoes don't taste raw).
3. Stir in the water and vodka, then add the paste. Increase the heat to medium-high, cover, and cook, stirring often and adjusting the heat to maintain a rigorous simmer, until the pasta is tender, abou15 to 18 minutes.
4. Stir in the cream and cook until hot, about 1 minute (I usually take it off the heat to stir in the cream because the residual heat will warm the cream fast enough on its own), then add the basil and season with salt and pepper to taste. Serve, sprinkling with parmesan if desired.
Last night was probably the 3rd time I had made this, and I like it every time. It's very good with garlic bread and a salad. Ilene liked it too. Give it a try!
Thursday, June 17, 2010
Back to normal things
Last night I had the good fortune of the house to myself for a couple of hours. Because this rarely happens, I took advantage of it by watching tv on our "big tv." To my delight I found out that the season premier of Top Chef Season 7 started in less than an hour! Glory be halleluja. I love that show. I think I like it even more than Lost. Yes. I do. Food takes all, as far as I'm concerned.
If you don't watch Top Chef, you need to. It's on Bravo on Wednesdays at 8 (Central time).
You know how you always have personal favorites on shows, that don't necessarily have anything to do with their talent/skill? Usually I can pick out my favorites in the first couple of shows. So far, I've only seen one that might be my favorite.
My all-time favorite, however, was Kevin Gillespie from Season 6. I was really upset when he didn't win, and that the ONE person I wanted to lose more than anyone on the show won. Such a disappointment.
But I'm confident that I won't have this issue this season. Bravo, don't disappoint me.
Tuesday, June 15, 2010
THIS IS OF THE UTMOST IMPORTANCE
I want to take this time unrelated to cooking/baking/sewing/crafting to remind you of an issue that is very near and dear to my heart.
It's called the "your" versus "you're" dilemma. I'd like to help everyone solve it right now.
"your" = possession, as in "Hey, I like your buttons."
"you're" = contracted form of "you are" as in "You're welcome for taking this moment to teach you about the differences between 'your' and 'you're'."
Now, if I see anyone make this mistake again, I'm coming after you with something rusty. You have been warned.
Sunday, June 13, 2010
Cannoli Cupcakes
Jack Night tomorrow. My assignment: dessert. Jack-Nighter Ryan's birthday, too. Actually, it's also my dad's birthday tomorrow, but since I'll be at Jack Night and mom will be at a board meeting, we decided to celebrate tonight.
Anyway, the tradition with Jack Night is during an attendant's birthweek they get to choose the food. I'm not sure if the birthday guy chose it or not, but we're having manicotti. The running joke with Ryan is his love for cheese. While he does appear to like cheese, I'm not so sure it's to the extent that we make it, but it's all fun. We also joke about him being French (he's not). So because we're having an Italian dinner with ricotta cheese, I should make a dessert with cheese in it. Originally I was going to make cheesecake, but then I remembered seeing these Cannoli Cupcakes at sugarcrafter, and I thought it was perfect! Cheese, and Italian! So that's what I'll be bringing with me to Jack Night.
The recipe itself yielded way more than I needed to bring, so some are staying home. As I mentioned before, we celebrated dad's birthday today, and because our first two attempts at a "birthday cake" failed (missing ingredients, bad weather, etc.) we had the extra cupcakes.


 Don't you love the little flecks of real vanilla? I can't tell you how excited I was about those. I'd never used real vanilla before. Probably because it costs $3 for 2 skinny beans. Anyway, I love the little subtle elegance of them.
The cupcakes are quite delicious. I've never had cannoli before (though I'd LOVE to try it) so I can't tell you whether or not it tastes like it, but they are very good. The ricotta cheese gives them a nice undertone, and they have a nice citrus quality from the orange zest. I am glad, however, that I only put in half of the orange zest it called for, because the flavor is still there but it's not too strong, and I don't really care for orange. But I like the little zing of citrus it gives in these. I'm excited to take them to Jack Night and get everyone else's reactions.
Anyway, the tradition with Jack Night is during an attendant's birthweek they get to choose the food. I'm not sure if the birthday guy chose it or not, but we're having manicotti. The running joke with Ryan is his love for cheese. While he does appear to like cheese, I'm not so sure it's to the extent that we make it, but it's all fun. We also joke about him being French (he's not). So because we're having an Italian dinner with ricotta cheese, I should make a dessert with cheese in it. Originally I was going to make cheesecake, but then I remembered seeing these Cannoli Cupcakes at sugarcrafter, and I thought it was perfect! Cheese, and Italian! So that's what I'll be bringing with me to Jack Night.
The recipe itself yielded way more than I needed to bring, so some are staying home. As I mentioned before, we celebrated dad's birthday today, and because our first two attempts at a "birthday cake" failed (missing ingredients, bad weather, etc.) we had the extra cupcakes.


The cupcakes are quite delicious. I've never had cannoli before (though I'd LOVE to try it) so I can't tell you whether or not it tastes like it, but they are very good. The ricotta cheese gives them a nice undertone, and they have a nice citrus quality from the orange zest. I am glad, however, that I only put in half of the orange zest it called for, because the flavor is still there but it's not too strong, and I don't really care for orange. But I like the little zing of citrus it gives in these. I'm excited to take them to Jack Night and get everyone else's reactions.
Saturday, June 12, 2010
Anniversary//Gifts
This past Wednesday was mine and Garrick's 4 year anniversary. That day at work, I got s surprise delivery of a dozen roses. Now, every year up until now he sends me flowers at my work, but I have always gotten an arrangement of 3 roses, but this year I got a dozen! And to make it better, they were delivered by him, not a stranger. How nice.


Aren't they pretty? He also got me a beautiful brown skirt with blue and green embroidery and beading, and a green silky shirt with brown belt to match. It's soooo pretty I think I'm going to wear it to my friend's wedding this afternoon.
As is our tradition, we celebrated our anniversary on our date night (Friday) rather than on the actual day. Since I have Friday's off this summer, we made a whole "date day" out of it. We had lunch and went mini golfing, then went to Bonefish for dinner and saw Killers at the theater, then topped it off with dessert at Uptown Bistro. I had pecan parmesan crusted rainbow trout with garlic whipped potatoes for dinner, and we split a flourless chocolate torte and chocolate mousse for dessert. Sooo good.
Anyway, I made him a pair of dress pants and matching vest. As hard as it can be to make fitted clothes for someone else, the poor boy has a 29 inch waist and 33 inch length, do you have ANY idea how impossible it is for find pants that fit those proportions correctly? He needed it. I also got him the pocket watch he had been wanting since Christmas.


Don't they look nice? I'm quite proud.

This is the button detail on the vest. They're very manly, I think.


And this is the pocket watch. It's pretty cool, I think. He says his favorite thing that I gave him were the pants, but I think the watch was his real favorite.
All in all, I think it was a great anniversary, as always. I look forward to all of our future ones.
Subscribe to:
Posts (Atom)